


1106

THINKPHP的cron计划任务的实现,利用THINKPHP自带的cli,加上数据库执行记录(记录任务的报错,成功)。在服务器cron定时任务在网站目录(不是网站根目录)执行php cron.php,网站根目录为Public。写一个cli的入口文件cli.php123456789101112<?phpdefine('MODE_NAME', 'cli');// 检测PHP环境if(version_compare(PHP_VERSION,'5.3.0','<')) die('require PHP > 5.3.0 !'); define('APP_DEBUG', true); // 定义应用目录define('APP_PATH', __DIR__ . '/Application/'); // 引入ThinkPHP入口文件require __DIR__ . '/ThinkPHP/ThinkPHP.php';写一个执行文件cron.php12define('AUTO_CRON', true);include __DIR__ . '/cli.php';数据库设计123456789101112131415161718DROP TABLE IF EXISTS `cron`;CREATE TABLE IF NOT EXISTS `cron` ( `cron_id` int(10) unsigned NOT NULL AUTO_INCREMENT, `name` varchar(255) COLLATE utf8_unicode_ci NOT NULL DEFAULT '', `expression` varchar(255) COLLATE utf8_unicode_ci NOT NULL DEFAULT '', `class` varchar(255) COLLATE utf8_unicode_ci NOT NULL DEFAULT '', `method` varchar(255) COLLATE utf8_unicode_ci NOT NULL DEFAULT '', `type` varchar(30) COLLATE utf8_unicode_ci NOT NULL DEFAULT '', `status` varchar(30) COLLATE utf8_unicode_ci NOT NULL DEFAULT '', `created_at` timestamp NOT NULL DEFAULT '0000-00-00 00:00:00', `updated_at` timestamp NOT NULL DEFAULT '0000-00-00 00:00:00', `run_at` timestamp NULL DEFAULT NULL, `ms` int(10) unsigned NOT NULL DEFAULT '0', `error` text COLLATE utf8_unicode_ci NOT NULL, PRIMARY KEY (`cron_id`), KEY `name` (`name`,`created_at`), KEY `cron_status_index` (`status`)) ENGINE=InnoDB DEFAULT CHARSET=utf8 COLLATE=utf8_unicode_ci AUTO_INCREMENT=1 ;配置文件1234567891011<?phpreturn array( 'version' => '1.0.0', 'beastalkd' => array( 'process_untreated_queue' => array( 'expression' => '* * * * *', 'class' => 'Statistics\Model\PheanstalkModel', 'method' => 'processUntreatedQueue' ) ));执行文件 init.php/写个hook程序执行init.php12345678910111213141516171819202122232425262728293031323334353637383940414243444546474849505152535455565758596061626364656667686970717273747576777879808182<?phpuse Think\Log, Think\Db, Cron\Model\Cron;$Model = new \Think\Model();$Has = !$Model->query("SHOW TABLES LIKE 'cron'")?false:true; if(defined("AUTO_CRON") && $Has){ class CronCommand { protected $_initializedJobs; protected $_jobs; protected $_now; public function __construct() { $this->_now = strtotime(date('Y-n-j H:i')); import("Cron.Common.Cron.tdcron_entry",'','.php'); import("Cron.Common.Cron.tdcron",'','.php'); } /** * 这里是放要执行的代码 */ public function fire() { restore_error_handler(); restore_exception_handler(); $this->_initializedJobs = array(); $jobs = M('cron')->where("status = 'initialized'")->select(); /** * @var $cron Cron * 已存在 cron */ if($jobs) { $cron = new Cron(); foreach ($jobs as $data) { $cron->setData($data)->isNew(false); $this->_initializedJobs[$data['name']] = $cron; } } /** * 新 cron */ foreach ($this->getCronJobs() as $name => $cronJob) { if (isset($cronJob['expression'])) { $expression = $cronJob['expression']; } else { Log::write('Cron expression is required for cron job "' . $name . '"',Log::WARN); continue; } if ($this->_now != tdCron::getNextOccurrence($expression, $this->_now)) continue; $cronJob['name'] = $name; $cron = isset($this->_initializedJobs[$name]) ? $this->_initializedJobs[$name] : $this->_initializedJobs[$name] = new Cron(); $cron->initialize($cronJob); } /* @var $cron Cron 处理*/ foreach ($this->_initializedJobs as $cron) { $cron->run(); } } /** * Get All Defined Cron Jobs * 获取配置 * @return array */ public function getCronJobs() { if ($this->_jobs === null) { $this->_jobs = C('beastalkd'); } return $this->_jobs; } } $command = new CronCommand(); $command->fire();}cron 模型12345678910111213141516171819202122232425262728293031323334353637383940414243444546474849505152535455565758596061626364656667686970717273747576777879808182838485868788<?phpnamespace Cron\Model;use Common\Model;use Think\Log; /** * Class Cron * @method string getClass() * @method string getMethod() * @method string getName() * @method string getType() * @package Cron\Model */class Cron extends Model{ const STATUS_COMPLETED = 'completed'; const STATUS_FAILED = 'failed'; const STATUS_INITIALIZED = 'initialized'; const STATUS_RUNNING = 'running'; protected $name = 'cron'; protected $tableName = 'cron'; protected $pk = 'cron_id'; protected $_originalData = array(); /** * 保存配置信息CLASS */ protected static $_cron_classes = array(); /** * @param $class * @return mixed 获取配置的 CLASS */ public function getSingleton($class) { isset(static::$_cron_classes[$class]) or static::$_cron_classes[$class] = new $class; return static::$_cron_classes[$class]; } /** * @param $cronJob * @return $this * 初始化 任务状态 */ public function initialize($cronJob) { foreach ($cronJob as $k => $v) { $this->setData($k, $v); } $now = date('Y-m-d H:i:s'); $this->setData('status',self::STATUS_INITIALIZED)->setData('created_at',$now)->setData('updated_at',$now)->save(); return $this; } /** * @return $this run 命令 */ public function run() { $this->setData('run_at',date('Y-m-d H:i:s'))->setData('status',self::STATUS_RUNNING)->save(); Timer::start(); try { $class = $this->getData('class'); $method = $this->getData('method'); if (!class_exists($class)) throw new \Exception(sprintf('Class "%s" not found!', $class)); if (!method_exists($class, $method)) throw new \Exception(sprintf('Method "%s::%s()" not found!', $class, $method)); $callback = array($this->getSingleton($class), $method); //new CLASS 使用操作方法 // 执行配置里的 Statistics\Model\PheanstalkModel类 的 processUntreatedQueue 操作 call_user_func($callback); Timer::stop(); $this->setData('ms',round(Timer::diff() * 1000))->setData('status',self::STATUS_COMPLETED)->save(); } catch (\Exception $e) { Timer::stop(); $this->setData('ms',round(Timer::diff() * 1000)) ->setData('status',self::STATUS_FAILED) ->setData('error',$e->getMessage() . "\nParams:\n" . var_export($this->getDbFields(), true))->save(); Log::write($e->getMessage() . "\n" . $e->getTraceAsString(),Log::ERR); } return $this; } }Common\Model 模型12345678910111213141516171819202122232425262728293031323334353637383940414243444546474849505152535455565758596061626364656667686970717273747576777879808182838485868788899091929394<?php namespace Common; use Think\Model as ThinkModel; /** * Class Model * @package Common * * @property \Think\Db\Driver\Mysql $db DB instance */abstract class Model extends ThinkModel { protected $_isNew = true; protected $_jsonFields = array(); protected $_originalData = array(); protected function _after_find(&$result, $options) { foreach ($this->_jsonFields as $field) { is_string($_data = fnGet($result, $field)) and $result[$field] = json_decode($_data, true); } $this->_originalData = $result; $this->_isNew = !$result; parent::_after_find($result, $options); } protected function _after_save($result) { } protected function _before_find() { $this->_originalData = array(); } protected function _facade($data) { foreach ($this->_jsonFields as $field) { is_array($_data = fnGet($data, $field)) and $data[$field] = json_encode($_data); } return parent::_facade($data); } public function find($options = array()) { $this->_before_find(); return parent::find($options); } public function getData($key = null) { return $key === null ? $this->data : $this->__get($key); } public function getOptions() { return $this->options; } public function getOriginalData($key = null) { return $key === null ? $this->_originalData : fnGet($this->_originalData, $key); } /** * Get or set isNew flag * * @param bool $flag * * @return bool */ public function isNew($flag = null) { if ($flag !== null) $this->_isNew = (bool)$flag; return $this->_isNew; } public function save($data = '', $options = array()) { if ($this->_isNew) { $oldData = $this->data; $result = $this->add($data, $options); $this->data = $oldData; if ($result && $this->pk && is_string($this->pk)) { $this->setData($this->pk, $result); } $this->_isNew = false; } else { $oldData = $this->data; $result = parent::save($data, $options); $this->data = $oldData; } $this->_after_save($result); return $result; } public function setData($key, $value = null) { is_array($key) ? $this->data = $key : $this->data[$key] = $value; return $this; }}Timer.class.php1234567891011121314151617181920212223242526<?phpnamespace Cron\Model;class Timer{ protected static $_start = array(0, 0); protected static $_stop = array(0, 0); public static function diff($start = null, $stop = null) { $start and self::start($start); $stop and self::stop($stop); return (self::$_stop[0] - self::$_start[0]) + (self::$_stop[1] - self::$_start[1]); } public static function start($microtime = null) { $microtime or $microtime = microtime(); self::$_start = explode(' ', $microtime); } public static function stop($microtime = null) { $microtime or $microtime = microtime(); self::$_stop = explode(' ', $microtime); }}tdcron.php123456789101112131415161718192021222324252627282930313233343536373839404142434445464748495051525354555657585960616263646566676869707172737475767778798081828384858687888990919293949596979899100101102103104105106107108109110111112113114115116117118119120121122123124125126127128129130131132133134135136137138139140141142143144145146147148149150151152153154155156157158159160161162163164165166167168169170171172173174175176177178179180181182183184185186187188189190191192193194195196197198199200201202203204205206207208209210211212213214215216217218219220221222223224225226227228229230231232233234235236237238239240241242243244245246247248249250251252253254255256257258259260261262263264265266267268269270271272273274275276277278279280281282283284285286287288289290291292293294295296297298299300301302303304305306307308309310311312313314315316317318319320321322323324325326327328329330331332333334<?php define('IDX_MINUTE', 0);define('IDX_HOUR', 1);define('IDX_DAY', 2);define('IDX_MONTH', 3);define('IDX_WEEKDAY', 4);define('IDX_YEAR', 5); /* * tdCron v0.0.1 beta - CRON-Parser for PHP * * Copyright (c) 2010 Christian Land / tagdocs.de * * Permission is hereby granted, free of charge, to any person obtaining a copy of this software and * associated documentation files (the "Software"), to deal in the Software without restriction, * including without limitation the rights to use, copy, modify, merge, publish, distribute, sublicense, * and/or sell copies of the Software, and to permit persons to whom the Software is furnished to do so, * subject to the following conditions: * * The above copyright notice and this permission notice shall be included in all copies or substantial * portions of the Software. * * THE SOFTWARE IS PROVIDED "AS IS", WITHOUT WARRANTY OF ANY KIND, EXPRESS OR IMPLIED, INCLUDING BUT NOT * LIMITED TO THE WARRANTIES OF MERCHANTABILITY, FITNESS FOR A PARTICULAR PURPOSE AND NONINFRINGEMENT. IN * NO EVENT SHALL THE AUTHORS OR COPYRIGHT HOLDERS BE LIABLE FOR ANY CLAIM, DAMAGES OR OTHER LIABILITY, * WHETHER IN AN ACTION OF CONTRACT, TORT OR OTHERWISE, ARISING FROM, OUT OF OR IN CONNECTION WITH THE * SOFTWARE OR THE USE OR OTHER DEALINGS IN THE SOFTWARE. * * @author Christian Land <devel@tagdocs.de> * @package tdCron * @copyright Copyright (c) 2010, Christian Land / tagdocs.de * @version v0.0.1 beta */ class tdCron{ /** * Parsed cron-expressions cache. * @var mixed */ static private $pcron = array(); /** * getNextOccurrence() uses a cron-expression to calculate the time and date at which a cronjob * should be executed the next time. If a reference-time is passed, the next time and date * after that time is calculated. * * @access public * @param string $expression cron-expression to use * @param int $timestamp optional reference-time * @return int * @throws Exception */ static public function getNextOccurrence($expression, $timestamp = null) { try { // Convert timestamp to array $next = self::getTimestamp($timestamp); // Calculate date/time $next_time = self::calculateDateTime($expression, $next); } catch (Exception $e) { throw $e; } // return calculated time return $next_time; } /** * getLastOccurrence() does pretty much the same as getNextOccurrence(). The only difference * is, that it doesn't calculate the next but the last time a cronjob should have been executed. * * @access public * @param string $expression cron-expression to use * @param int $timestamp optional reference-time * @return int * @throws Exception */ static public function getLastOccurrence($expression, $timestamp = null) { try { // Convert timestamp to array $last = self::getTimestamp($timestamp); // Calculate date/time $last_time = self::calculateDateTime($expression, $last, false); } catch (Exception $e) { throw $e; } // return calculated time return $last_time; } /** * calculateDateTime() is the function where all the magic happens :-) * * It calculates the time and date at which the next/last call of a cronjob is/was due. * * @access private * @param mixed $expression cron-expression * @param mixed $rtime reference-time * @param bool $next true = nextOccurence, false = lastOccurence * @return int * @throws Exception */ static private function calculateDateTime($expression, $rtime, $next = true) { // Initialize vars $calc_date = true; // Parse cron-expression (if neccessary) $cron = self::getExpression($expression, !$next); // OK, lets see if the day/month/weekday of the reference-date exist in our // $cron-array. if (!in_array($rtime[IDX_DAY], $cron[IDX_DAY]) || !in_array($rtime[IDX_MONTH], $cron[IDX_MONTH]) || !in_array($rtime[IDX_WEEKDAY], $cron[IDX_WEEKDAY])) { // OK, things are easy. The day/month/weekday of the reference time // can't be found in the $cron-array. This means that no matter what // happens, we WILL end up at at a different date than that of our // reference-time. And in this case, the lastOccurrence will ALWAYS // happen at the latest possible time of the day and the nextOccurrence // at the earliest possible time. // // In both cases, the time can be found in the first elements of the // hour/minute cron-arrays. $rtime[IDX_HOUR] = reset($cron[IDX_HOUR]); $rtime[IDX_MINUTE] = reset($cron[IDX_MINUTE]); } else { // OK, things are getting a little bit more complicated... $nhour = self::findValue($rtime[IDX_HOUR], $cron[IDX_HOUR], $next); // Meh. Such a cruel world. Something has gone awry. Lets see HOW awry it went. if ($nhour === false) { // Ah, the hour-part went wrong. Thats easy. Wrong hour means that no // matter what we do we'll end up at a different date. Thus we can use // some simple operations to make things look pretty ;-) // // As alreasy mentioned before -> different date means earliest/latest // time: $rtime[IDX_HOUR] = reset($cron[IDX_HOUR]); $rtime[IDX_MINUTE] = reset($cron[IDX_MINUTE]); // Now all we have to do is add/subtract a day to get a new reference time // to use later to find the right date. The following line probably looks // a little odd but thats the easiest way of adding/substracting a day without // screwing up the date. Just trust me on that one ;-) $rtime = explode(',', strftime('%M,%H,%d,%m,%w,%Y', mktime($rtime[IDX_HOUR], $rtime[IDX_MINUTE], 0, $rtime[IDX_MONTH], $rtime[IDX_DAY], $rtime[IDX_YEAR]) + ((($next) ? 1 : -1) * 86400))); } else { // OK, there is a higher/lower hour available. Check the minutes-part. $nminute = self::findValue($rtime[IDX_MINUTE], $cron[IDX_MINUTE], $next); if ($nminute === false) { // No matching minute-value found... lets see what happens if we substract/add an hour $nhour = self::findValue($rtime[IDX_HOUR] + (($next) ? 1 : -1), $cron[IDX_HOUR], $next); if ($nhour === false) { // No more hours available... add/substract a day... you know what happens ;-) $nminute = reset($cron[IDX_MINUTE]); $nhour = reset($cron[IDX_HOUR]); $rtime = explode(',', strftime('%M,%H,%d,%m,%w,%Y', mktime($nhour, $nminute, 0, $rtime[IDX_MONTH], $rtime[IDX_DAY], $rtime[IDX_YEAR]) + ((($next) ? 1 : -1) * 86400))); } else { // OK, there was another hour. Set the right minutes-value $rtime[IDX_HOUR] = $nhour; $rtime[IDX_MINUTE] = (($next) ? reset($cron[IDX_MINUTE]) : end($cron[IDX_MINUTE])); $calc_date = false; } } else { // OK, there is a matching minute... reset minutes if hour has changed if ($nhour <> $rtime[IDX_HOUR]) { $nminute = reset($cron[IDX_MINUTE]); } // Set time $rtime[IDX_HOUR] = $nhour; $rtime[IDX_MINUTE] = $nminute; $calc_date = false; } } } // If we have to calculate the date... we'll do so if ($calc_date) { if (in_array($rtime[IDX_DAY], $cron[IDX_DAY]) && in_array($rtime[IDX_MONTH], $cron[IDX_MONTH]) && in_array($rtime[IDX_WEEKDAY], $cron[IDX_WEEKDAY])) { return mktime($rtime[1], $rtime[0], 0, $rtime[3], $rtime[2], $rtime[5]); } else { // OK, some searching necessary... $cdate = mktime(0, 0, 0, $rtime[IDX_MONTH], $rtime[IDX_DAY], $rtime[IDX_YEAR]); // OK, these three nested loops are responsible for finding the date... // // The class has 2 limitations/bugs right now: // // -> it doesn't work for dates in 2036 or later! // -> it will most likely fail if you search for a Feburary, 29th with a given weekday // (this does happen because the class only searches in the next/last 10 years! And // while it usually takes less than 10 years for a "normal" date to iterate through // all weekdays, it can take 20+ years for Feb, 29th to iterate through all weekdays! for ($nyear = $rtime[IDX_YEAR]; (($next) ? ($nyear <= $rtime[IDX_YEAR] + 10) : ($nyear >= $rtime[IDX_YEAR] - 10)); $nyear = $nyear + (($next) ? 1 : -1)) { foreach ($cron[IDX_MONTH] as $nmonth) { foreach ($cron[IDX_DAY] as $nday) { if (checkdate($nmonth, $nday, $nyear)) { $ndate = mktime(0, 0, 1, $nmonth, $nday, $nyear); if (($next) ? ($ndate >= $cdate) : ($ndate <= $cdate)) { $dow = date('w', $ndate); // The date is "OK" - lets see if the weekday matches, too... if (in_array($dow, $cron[IDX_WEEKDAY])) { // WIN! :-) We found a valid date... $rtime = explode(',', strftime('%M,%H,%d,%m,%w,%Y', mktime($rtime[IDX_HOUR], $rtime[IDX_MINUTE], 0, $nmonth, $nday, $nyear))); return mktime($rtime[1], $rtime[0], 0, $rtime[3], $rtime[2], $rtime[5]); } } } } } } } throw new Exception('Failed to find date, No matching date found in a 10 years range!', 10004); } return mktime($rtime[1], $rtime[0], 0, $rtime[3], $rtime[2], $rtime[5]); } /** * getTimestamp() converts an unix-timestamp to an array. The returned array contains the following values: * * [0] -> minute * [1] -> hour * [2] -> day * [3] -> month * [4] -> weekday * [5] -> year * * The array is used by various functions. * * @access private * @param int $timestamp If none is given, the current time is used * @return mixed */ static private function getTimestamp($timestamp = null) { if (is_null($timestamp)) { $arr = explode(',', strftime('%M,%H,%d,%m,%w,%Y', time())); } else { $arr = explode(',', strftime('%M,%H,%d,%m,%w,%Y', $timestamp)); } // Remove leading zeros (or we'll get in trouble ;-) foreach ($arr as $key => $value) { $arr[$key] = (int)ltrim($value, '0'); } return $arr; } /** * findValue() checks if the given value exists in an array. If it does not exist, the next * higher/lower value is returned (depending on $next). If no higher/lower value exists, * false is returned. * * @access public * @param int $value * @param mixed $data * @param bool $next * @return mixed */ static private function findValue($value, $data, $next = true) { if (in_array($value, $data)) { return (int)$value; } else { if (($next) ? ($value <= end($data)) : ($value >= end($data))) { foreach ($data as $curval) { if (($next) ? ($value <= (int)$curval) : ($curval <= $value)) { return (int)$curval; } } } } return false; } /** * getExpression() returns a parsed cron-expression. Parsed cron-expressions are cached to reduce * unneccessary calls of the parser. * * @access public * @param string $expression * @param bool $reverse * @return mixed * @throws Exception */ static private function getExpression($expression, $reverse = false) { // First of all we cleanup the expression and remove all duplicate tabs/spaces/etc. // For example "* * * * *" would be converted to "* * * * *", etc. $expression = preg_replace('/(\s+)/', ' ', strtolower(trim($expression))); // Lets see if we've already parsed that expression if (!isset(self::$pcron[$expression])) { // Nope - parse it! try { self::$pcron[$expression] = tdCronEntry::parse($expression); self::$pcron['reverse'][$expression] = self::arrayReverse(self::$pcron[$expression]); } catch (Exception $e) { throw $e; } } return ($reverse ? self::$pcron['reverse'][$expression] : self::$pcron[$expression]); } /** * arrayReverse() reverses all sub-arrays of our cron array. The reversed values are used for calculations * that are run when getLastOccurence() is called. * * @access public * @param mixed $cron * @return mixed */ static private function arrayReverse($cron) { foreach ($cron as $key => $value) { $cron[$key] = array_reverse($value); } return $cron; }}tdcron_entry.php123456789101112131415161718192021222324252627282930313233343536373839404142434445464748495051525354555657585960616263646566676869707172737475767778798081828384858687888990919293949596979899100101102103104105106107108109110111112113114115116117118119120121122123124125126127128129130131132133134135136137138139140141142143144145146147148149150151152153154155156157158159160161162163164165166167168169170171172173174175176177178179180181182183184185186187188189190191192193194195196197198199200201202203204205206207208209210211212213214215216217218219220221222223224225226227228229230231232233234235236237238239240241242243244245246247248249250251252253254255256257258<?php /** * tinyCronEntry is part of tdCron. Its a class to parse Cron-Expressions like "1-45 1,2,3 1-30/5 January,February Mon,Tue" * and convert it to an easily useable format. * * The parser is quite powerful and understands pretty much everything you will ever find in a Cron-Expression. * * A Cron-Expression consists of 5 segments: * * <pre> * .---------------- minute (0 - 59) * | .------------- hour (0 - 23) * | | .---------- day of month (1 - 31) * | | | .------- month (1 - 12) * | | | | .----- day of week (0 - 6) * | | | | | * * * * * * * </pre> * * Each segment can contain values, ranges and intervals. A range is always written as "value1-value2" and * intervals as "value1/value2". * * Of course each segment can contain multiple values seperated by commas. * * Some valid examples: * * <pre> * 1,2,3,4,5 * 1-5 * 10-20/* * Jan,Feb,Oct * Monday-Friday * 1-10,15,20,40-50/2 * </pre> * * The current version of the parser understands all weekdays and month names in german and english! * * Usually you won't need to call this class directly. * * Copyright (c) 2010 Christian Land / tagdocs.de * * Permission is hereby granted, free of charge, to any person obtaining a copy of this software and * associated documentation files (the "Software"), to deal in the Software without restriction, * including without limitation the rights to use, copy, modify, merge, publish, distribute, sublicense, * and/or sell copies of the Software, and to permit persons to whom the Software is furnished to do so, * subject to the following conditions: * * The above copyright notice and this permission notice shall be included in all copies or substantial * portions of the Software. * * THE SOFTWARE IS PROVIDED "AS IS", WITHOUT WARRANTY OF ANY KIND, EXPRESS OR IMPLIED, INCLUDING BUT NOT * LIMITED TO THE WARRANTIES OF MERCHANTABILITY, FITNESS FOR A PARTICULAR PURPOSE AND NONINFRINGEMENT. IN * NO EVENT SHALL THE AUTHORS OR COPYRIGHT HOLDERS BE LIABLE FOR ANY CLAIM, DAMAGES OR OTHER LIABILITY, * WHETHER IN AN ACTION OF CONTRACT, TORT OR OTHERWISE, ARISING FROM, OUT OF OR IN CONNECTION WITH THE * SOFTWARE OR THE USE OR OTHER DEALINGS IN THE SOFTWARE. * * @author Christian Land <devel@tagdocs.de> * @package tinyCron * @subpackage tinyCronEntry * @copyright Copyright (c) 2010, Christian Land / tagdocs.de * @version v0.0.1 beta */class tdCronEntry{ /** * The parsed cron-expression. * @var mixed */ static private $cron = array(); /** * Ranges. * @var mixed */ static private $ranges = array( IDX_MINUTE => array('min' => 0, 'max' => 59), // Minutes IDX_HOUR => array('min' => 0, 'max' => 23), // Hours IDX_DAY => array('min' => 1, 'max' => 31), // Days IDX_MONTH => array('min' => 1, 'max' => 12), // Months IDX_WEEKDAY => array('min' => 0, 'max' => 7) // Weekdays ); /** * Named intervals. * @var mixed */ static private $intervals = array( '@yearly' => '0 0 1 1 *', '@annually' => '0 0 1 1 *', '@monthly' => '0 0 1 * *', '@weekly' => '0 0 * * 0', '@midnight' => '0 0 * * *', '@daily' => '0 0 * * *', '@hourly' => '0 * * * *' ); /** * Possible keywords for months/weekdays. * @var mixed */ static private $keywords = array( IDX_MONTH => array( '/(january|januar|jan)/i' => 1, '/(february|februar|feb)/i' => 2, '/(march|maerz|m?rz|mar|mae|m?r)/i' => 3, '/(april|apr)/i' => 4, '/(may|mai)/i' => 5, '/(june|juni|jun)/i' => 6, '/(july|juli|jul)/i' => 7, '/(august|aug)/i' => 8, '/(september|sep)/i' => 9, '/(october|oktober|okt|oct)/i' => 10, '/(november|nov)/i' => 11, '/(december|dezember|dec|dez)/i' => 12 ), IDX_WEEKDAY => array( '/(sunday|sonntag|sun|son|su|so)/i' => 0, '/(monday|montag|mon|mo)/i' => 1, '/(tuesday|dienstag|die|tue|tu|di)/i' => 2, '/(wednesdays|mittwoch|mit|wed|we|mi)/i' => 3, '/(thursday|donnerstag|don|thu|th|do)/i' => 4, '/(friday|freitag|fre|fri|fr)/i' => 5, '/(saturday|samstag|sam|sat|sa)/i' => 6 ) ); /** * parseExpression() analyses crontab-expressions like "* * 1,2,3 * mon,tue" and returns an array * containing all values. If it can't be parsed, an exception is thrown. * * @access public * @param string $expression The cron-expression to parse. * @return mixed * @throws Exception */ static public function parse($expression) { $dummy = array(); // Convert named expressions if neccessary if (substr($expression, 0, 1) == '@') { $expression = strtr($expression, self::$intervals); if (substr($expression, 0, 1) == '@') { // Oops... unknown named interval!?!! throw new Exception('Unknown named interval [' . $expression . ']', 10000); } } // Next basic check... do we have 5 segments? $cron = explode(' ', $expression); if (count($cron) <> 5) { // No... we haven't... throw new Exception('Wrong number of segments in expression. Expected: 5, Found: ' . count($cron), 10001); } else { // Yup, 5 segments... lets see if we can work with them foreach ($cron as $idx => $segment) { try { $dummy[$idx] = self::expandSegment($idx, $segment); } catch (Exception $e) { throw $e; } } } return $dummy; } /** * expandSegment() analyses a single segment * * @access public * @param $idx * @param $segment * @return array * @throws Exception */ static private function expandSegment($idx, $segment) { // Store original segment for later use $osegment = $segment; // Replace months/weekdays like "January", "February", etc. with numbers if (isset(self::$keywords[$idx])) { $segment = preg_replace(array_keys(self::$keywords[$idx]), array_values(self::$keywords[$idx]), $segment); } // Replace wildcards if (substr($segment, 0, 1) == '*') { $segment = preg_replace('/^\*(\/\d+)?$/i', self::$ranges[$idx]['min'] . '-' . self::$ranges[$idx]['max'] . '$1', $segment); } // Make sure that nothing unparsed is left :) $dummy = preg_replace('/[0-9\-\/\,]/', '', $segment); if (!empty($dummy)) { // Ohoh.... thats not good :-) throw new Exception('Failed to parse segment: ' . $osegment, 10002); } // At this point our string should be OK - lets convert it to an array $result = array(); $atoms = explode(',', $segment); foreach ($atoms as $curatom) { $result = array_merge($result, self::parseAtom($curatom)); } // Get rid of duplicates and sort the array $result = array_unique($result); sort($result); // Check for invalid values if ($idx == IDX_WEEKDAY) { if (end($result) == 7) { if (reset($result) <> 0) { array_unshift($result, 0); } array_pop($result); } } foreach ($result as $key => $value) { if (($value < self::$ranges[$idx]['min']) || ($value > self::$ranges[$idx]['max'])) { throw new Exception('Failed to parse segment, invalid value [' . $value . ']: ' . $osegment, 10003); } } return $result; } /** * parseAtom() analyses a single segment * * @access public * @param string $atom The segment to parse * @return array */ static private function parseAtom($atom) { $expanded = array(); if (preg_match('/^(\d+)-(\d+)(\/(\d+))?/i', $atom, $matches)) { $low = $matches[1]; $high = $matches[2]; if ($low > $high) { list($low, $high) = array($high, $low); } $step = isset($matches[4]) ? $matches[4] : 1; for ($i = $low; $i <= $high; $i += $step) { $expanded[] = (int)$i; } } else { $expanded[] = (int)$atom; } $expanded2 = array_unique($expanded); return $expanded; }}推荐教程:《TP5》以上就是THINKPHP的cron任务实现的详细内容

0
0 1402天前
1308
ThinkPHP提供了自带的错误提示页面,但是并不美观,提示信息显示如下:我们如果想要更换提示页面应该怎么做呢?以ThinkPHP3.2为例:在应用配置文件(应用文件目录/Common/Conf/config.php)中添加:1234/* 错误页面模板 */'TMPL_ACTION_ERROR' => 'Public/dispatch_jump.html', // 默认错误跳转对应的模板文件''TMPL_ACTION_SUCCESS' => 'Public/dispatch_jump.html', // 默认成功跳转对应的模板文件'//'TMPL_EXCEPTION_FILE' => 'Public/exception.html',// 异常页面的模板文件然后我是在项目公共文件(项目目录/Public)中新建了dispatch_jump.html,模板内容如下:12345678910111213141516171819202122232425262728293031323334353637383940414243444546474849505152535455565758596061626364656667686970<!DOCTYPE html><html> <head> <meta http-equiv="Content-Type" content="text/html; charset=utf-8" /> <title>跳转提示</title> <meta name="viewport" content="width=device-width, initial-scale=1.0"> <style type="text/css"> *{box-sizing:border-box;margin:0;padding:0;font-family:Lantinghei SC,Open Sans,Arial,Hiragino Sans GB,Microsoft YaHei,"微软雅黑",STHeiti,WenQuanYi Micro Hei,SimSun,sans-serif;-webkit-font-smoothing:antialiased} body{padding:70px 0;background:#edf1f4;font-weight:400;font-size:1pc;-webkit-text-size-adjust:none;color:#333} a{outline:0;color:#3498db;text-decoration:none;cursor:pointer} .system-message{margin:20px 5%;padding:40px 20px;background:#fff;box-shadow:1px 1px 1px hsla(0,0%,39%,.1);text-align:center} .system-message h1{margin:0;margin-bottom:9pt;color:#444;font-weight:400;font-size:40px} .system-message .jump,.system-message .image{margin:20px 0;padding:0;padding:10px 0;font-weight:400} .system-message .jump{font-size:14px} .system-message .jump a{color:#333} .system-message p{font-size:9pt;line-height:20px} .system-message .btn{display:inline-block;margin-right:10px;width:138px;height:2pc;border:1px solid #44a0e8;border-radius:30px;color:#44a0e8;text-align:center;font-size:1pc;line-height:2pc;margin-bottom:5px;} .success .btn{border-color:#69bf4e;color:#69bf4e} .error .btn{border-color:#ff8992;color:#ff8992} .info .btn{border-color:#3498db;color:#3498db} .copyright p{width:100%;color:#919191;text-align:center;font-size:10px} .system-message .btn-grey{border-color:#bbb;color:#bbb} .clearfix:after{clear:both;display:block;visibility:hidden;height:0;content:"."} @media (max-width:768px){body {padding:20px 0;}} @media (max-width:480px){.system-message h1{font-size:30px;}} </style> </head> <body> <div class="system-message error"> <?php if(isset($message)){ ?> <div class="image"> <img src="http://cdn.demo.fastadmin.net/assets/img/success.svg" alt="" width="150" /> </div> <h1> <?php echo $message; }else{ ?> <div class="image"> <img src="http://cdn.demo.fastadmin.net/assets/img/error.svg" alt="" width="150" /> </div> <h1> <?php echo $error; }?></h1> <p class="jump"> 页面将在 <span id="wait"><?php echo($waitSecond); ?></span><!-- <span id="wait">3</span> -->秒后自动<a id="href" href="<?php echo($jumpUrl); ?>">跳转</a> </p> <p class="clearfix"> <a href="javascript:history.go(-1);" class="btn btn-grey">返回上一步</a> <a href="<?php echo($jumpUrl); ?>" class="btn btn-primary">立即跳转</a> </p> </div> <script type="text/javascript"> (function () { var wait = document.getElementById('wait'), href = document.getElementById('href').href; var interval = setInterval(function () { var time = --wait.innerHTML; if (time <= 0) { location.href = href; clearInterval(interval); } }, 1000); })(); </script> </body></html>效果如下:推荐教程:《TP5》以上就是ThinkPHP中自定义错误、成功、异常提示页面的方法的详细内容


0
0 1402天前
1030
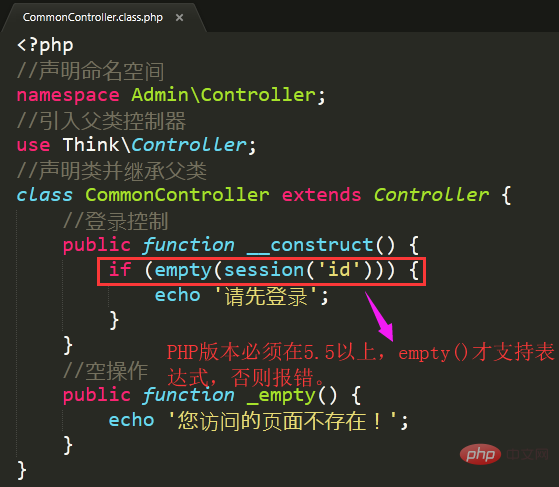
ThinkPHP支持两种构造方法: __construct和_initialize(ThinkPHP内置的构造方法)。修改用户控制器类文件UserController.class.php 如下:1、__construct构造方法修改中间控制器类CommonController.class.php 如下:说明:empty() 5.5 版本之后支持表达式,否则会报如下错误:运行结果如下:中间控制器必须先构造父类,才能使用父类的方法,修改代码如下:运行结果:2、_initialize构造方法,如下:通过_initialize构造方法同样可以实现上述效果,无需构造父类,查看基类控制器代码如下:通过Controller.class.php中的架构函数可以看出,只要存在 _initialize方法,就会直接调用来初始化控制器,因此ThinkPHP内置的构造方法无需再构造父类。推荐教程:《TP5》以上就是thinkphp登录限制时__construct和_initialize的区别介绍的详细内容


0
0 1402天前
1324
需求多加一个类似phpmyadmin一样的每页显示条数 查了好久都没找到看到thinkphp 分页类 是html拼接的 很low 但是方便了我修改 新增需求在原生分页类基础上 新定义了一个num变量show方法返回的时候 thinkphp拼接html的地方 新加了一段选择条数的代码123456789return "<ul class='am-pagination am-pagination-right'>{$page_str}</ul> <div class='am-dropdown am-dropdown-up' data-am-dropdown> <button class='am-btn am-btn-primary am-dropdown-toggle' data-am-dropdown-toggle>显示条数 <span class='am-icon-caret-up'></span></button> <ul class='am-dropdown-content'> <li><a href='".$this->urlNum(10,1)."'>10</a></li> <li><a href='".$this->urlNum(30,1)."'>30</a></li> <li><a href='".$this->urlNum(50,1)."'>50</a></li> </ul> </div>";然后新加的urlNum方法是这样:1234private function urlNum($num,$page){ $str = str_replace(urlencode('[PAGE]'), $page, $this->url); return str_replace(urlencode('[NUM]'), $num, $str);}开始的时候由于page这个变量 thinkphp会先变一个转码的 后面才替换而且page=1的时候 url里是不显示的 但是还有这个参数导致num这个变量老是搞得url 很不稳定 经常叠加后面只有做了一个小牺牲(选定每页显示条数的时候 url page即使为1 也会加上)不过这并没有什么影响整个代码分页类 就是这样:123456789101112131415161718192021222324252627282930313233343536373839404142434445464748495051525354555657585960616263646566676869707172737475767778798081828384858687888990919293949596979899100101102103104105106107108109110111112113114115116117118119120121122123124125126127128129130131132133134135136137138139140141142143144145146147148149150151152153154155156157158159160161162163<?php// +----------------------------------------------------------------------// | ThinkPHP [ WE CAN DO IT JUST THINK IT ]// +----------------------------------------------------------------------// | Copyright (c) 2006-2014 http://thinkphp.cn All rights reserved.// +----------------------------------------------------------------------// | Licensed ( http://www.apache.org/licenses/LICENSE-2.0 )// +----------------------------------------------------------------------// | Author: 麦当苗儿 <zuojiazi@vip.qq.com> <http://www.zjzit.cn>// +----------------------------------------------------------------------namespace Think; class Page{ public $firstRow; // 起始行数 public $listRows; // 列表每页显示行数 public $parameter; // 分页跳转时要带的参数 public $totalRows; // 总行数 public $totalPages; // 分页总页面数 public $rollPage = 11;// 分页栏每页显示的页数 public $lastSuffix = true; // 最后一页是否显示总页数 private $p = 'p'; //分页参数名 private $num = 'num'; //分页参数名 private $url = ''; //当前链接URL private $nowPage = 1; // 分页显示定制 private $config = array( 'header' => '<span class="rows">共 %TOTAL_ROW% 条记录</span>', 'prev' => '«', 'next' => '»', 'first' => '1...', 'last' => '...%TOTAL_PAGE%', 'theme' => '%HEADER% %FIRST% %UP_PAGE% %LINK_PAGE% %DOWN_PAGE% %END%', ); /** * 架构函数 * @param array $totalRows 总的记录数 * @param array $listRows 每页显示记录数 * @param array $parameter 分页跳转的参数 */ public function __construct($totalRows, $listRows=20, $parameter = array()) { C('VAR_PAGE') && $this->p = C('VAR_PAGE'); //设置分页参数名称 /* 基础设置 */ $this->totalRows = $totalRows; //设置总记录数 $this->listRows = $listRows; //设置每页显示行数 $this->parameter = empty($parameter) ? $_GET : $parameter; $this->nowPage = empty($_GET[$this->p]) ? 1 : intval($_GET[$this->p]); $this->nowPage = $this->nowPage>0 ? $this->nowPage : 1; $this->firstRow = $this->listRows * ($this->nowPage - 1); } /** * 定制分页链接设置 * @param string $name 设置名称 * @param string $value 设置值 */ public function setConfig($name,$value) { if(isset($this->config[$name])) { $this->config[$name] = $value; } } /** * 生成链接URL * @param integer $page 页码 * @return string */ private function url($page){ // return str_replace(urlencode('[PAGE]'), $page, $this->url); $num = $_GET['num'] ? $_GET['num'] : '10'; $str = str_replace(urlencode('[NUM]'), $num, $this->url); return str_replace(urlencode('[PAGE]'), $page, $str); } private function urlNum($num,$page){ $str = str_replace(urlencode('[PAGE]'), $page, $this->url); return str_replace(urlencode('[NUM]'), $num, $str); } /** * 组装分页链接 * @return string */ public function show() { if(0 == $this->totalRows) return ''; /* 生成URL */ // echo $this->num;die; $this->parameter[$this->p] = '[PAGE]'; // $num = empty($_GET['num']) ? '20' : ''; $this->parameter[$this->num] = '[NUM]'; $this->url = U(ACTION_NAME, $this->parameter); /* 计算分页信息 */ $this->totalPages = ceil($this->totalRows / $this->listRows); //总页数 if(!empty($this->totalPages) && $this->nowPage > $this->totalPages) { $this->nowPage = $this->totalPages; } /* 计算分页临时变量 */ $now_cool_page = $this->rollPage/2; $now_cool_page_ceil = ceil($now_cool_page); $this->lastSuffix && $this->config['last'] = $this->totalPages; //上一页 $up_row = $this->nowPage - 1; $up_page = $up_row > 0 ? '<li><a class="prev" href="' . $this->url($up_row) . '">' . $this->config['prev'] . '</a></li>' : ''; //下一页 $down_row = $this->nowPage + 1; $down_page = ($down_row <= $this->totalPages) ? '<li><a class="next" href="' . $this->url($down_row) . '">' . $this->config['next'] . '</a></li>' : ''; //第一页 $the_first = ''; if($this->totalPages > $this->rollPage && ($this->nowPage - $now_cool_page) >= 1){ $the_first = '<li><a class="first" href="' . $this->url(1) . '">' . $this->config['first'] . '</a></li>'; } //最后一页 $the_end = ''; if($this->totalPages > $this->rollPage && ($this->nowPage + $now_cool_page) < $this->totalPages){ $the_end = '<li><a class="end" href="' . $this->url($this->totalPages) . '">' . $this->config['last'] . '</a></li>'; } //数字连接 $link_page = ""; for($i = 1; $i <= $this->rollPage; $i++){ if(($this->nowPage - $now_cool_page) <= 0 ){ $page = $i; }elseif(($this->nowPage + $now_cool_page - 1) >= $this->totalPages){ $page = $this->totalPages - $this->rollPage + $i; }else{ $page = $this->nowPage - $now_cool_page_ceil + $i; } if($page > 0 && $page != $this->nowPage){ if($page <= $this->totalPages){ $link_page .= '<li><a class="num" href="' . $this->url($page) . '">' . $page . '</a></li>'; }else{ break; } }else{ if($page > 0 && $this->totalPages != 1){ $link_page .= '<li class="am-active"><a href="#">' . $page . '</a></li>'; } } } //替换分页内容 $page_str = str_replace( array('%HEADER%', '%NOW_PAGE%', '%UP_PAGE%', '%DOWN_PAGE%', '%FIRST%', '%LINK_PAGE%', '%END%', '%TOTAL_ROW%', '%TOTAL_PAGE%'), array($this->config['header'], $this->nowPage, $up_page, $down_page, $the_first, $link_page, $the_end, $this->totalRows, $this->totalPages), $this->config['theme']); return "<ul class='am-pagination am-pagination-right'>{$page_str}</ul> <div class='am-dropdown am-dropdown-up' data-am-dropdown> <button class='am-btn am-btn-primary am-dropdown-toggle' data-am-dropdown-toggle>显示条数 <span class='am-icon-caret-up'></span></button> <ul class='am-dropdown-content'> <li><a href='".$this->urlNum(10,1)."'>10</a></li> <li><a href='".$this->urlNum(30,1)."'>30</a></li> <li><a href='".$this->urlNum(50,1)."'>50</a></li> </ul> </div>"; }}效果如下:推荐教程:《TP5》以上就是thinkphp增加每页显示条数的方法的详细内容
0
0 1402天前
1019
大家都知道在thinkphp里面,我们是通过在控制器里面给模板分配变量,然后在模板里面通过标签的方式来获取变量,假设有一个变量为$name,那么我们在模板里面就应该是通过。{$name}的方式来获取变量值,在这里问题就出来了,假设我们的这个模板里面还有其他的JS,CSS,比如我在模板里面还有这样一段JS代码如下:123456789101112131415<script type="text/javascript"> Var str=6; If(str>=6){ Alert('test'); }else{ Alert(''); } </script>如果模板里面有上述一段这样一段JS代码的话,那thinkphp解析模板的时候就会报错,因为在这段JS里面也出现了{}定界符,thinkphp就会认为{}里面的也是一个模板标签,然后去解析它,但它其实只是一段JS代码,所以就报错了。当我们碰到这种情况应该怎么处理呢?下面我们就来看一下thinkphp中修改定界符的方法:在thinkphp里面很多修改系统默认东西的操作都是通过配置文件来实现的,修改标签定界符也是通过在配置文件里面来指定的,我们来看一下具体应该怎么做,在config.php里面增加如下代码:1234567891011<?php return array( 'TMPL_L_DELIM'=>'<{', 'TMPL_R_DELIM'=>'}>', ); ?>通过上述代码我们也可以看出,标签定界符已经改成了<{}>,也就是说如果我们现在在控制器里面分配一个变量$this->assign(‘name’,$name),这个时候我们在模板里面就应该这样写了<{$name}>,这样就不会和JS或者CSS冲突了。推荐教程:《TP5》以上就是thinkphp中修改模板标签定界符的方法的详细内容
0
0 1402天前
1137
使用的是ThinkPHP自带的Authority权限类!ThinkPHP版本是3.1.3的我要实现的是根据模块名分配权限,当然,这个可以扩展到操作名。假如我有这些模块文件:那么 think_auth_rule表的内容差不多应该是这样的:比如,我的登录用户的uid=7.think_auth_group_access 表中有 uid=9 ,group=6;think_auth_group 表中有 id=6,title="宇宙管理员",rules="4,5,8";那么,我只要再模块文件CommAction.class.php中,添加:1234567891011121314151617class CommAction extends Action{ public function __construct(){ parent::__construct(); $this->assign('waitSecond',2); $this->checkRight(); } private function checkRight(){ import('ORG.Util.Authority'); $auth=new Authority(); $r = $auth->getAuth(MODULE_NAME,session('S_USER_ID')); if(!$r){ $this->error('没有权限!'); } }}然后,再让其它的模块文件继承这个文件,比如,ActivityAction.class.php:12345<?phpclass activityAction extends CommAction{//操作方法}?>就这样,当我访问think_auth_rules中id是4,5,8模块的时候,就可以正常访问;如果访问id是10,11,12,13的模块,就会跳转到失败,提示没有权限的页面了~现在我用这个权限类遇到的问题是:think_auth_rule表中的内容需要我手动去添加,这块是属性开发的,如果能自动生成就好了。推荐教程:《TP5》以上就是thinkphp中的模块权限分配的详细内容

0
0 1402天前
1085
AUTH权限管理的原理最简单的auth权限管理的4张数据表如下图每一个功能对应的一个url路径,规则表其实就是记录url路径,通过url来实现权限管理权限验证时机分类前置验证所谓前置认证,就是当前可访问的页面内部元素在显示前就进行权限验证。例如:游客访问网页时,看不到某个功能菜单,但管理员能看到等。前置验证用户体验好,但性能差点后置认证所谓后置认证,这个就简单,就是每个功能访问时先进行权限验证。例如,在页面上点击‘添加栏目’按钮,先进行验证,通过才执行添加栏目功能代码。后置验证用户体验差,但性能好权限验证代码实现位置在用户成功登陆后台后,后台所有菜单、导航、按钮的操作就必须进行权限验证但后台首页、欢迎页、用户退出等功能可无需权限验证,根据具体项目需求来订AUTH权限管理与RBAC权限管理的区别相同点:都是基于角色的权限管理不同点:数据表的设计不同,导致AUTH更灵活、权限管理更细腻权限模块设计推荐教程:《TP5》以上就是THINKPHP中的AUTH权限管理介绍的详细内容


0
0 1402天前
1088
PHP-Casbin 是一个强大的、高效的开源访问控制框架,它支持基于各种访问控制模型的权限管理。Think-Casbin 是一个专为ThinkPHP5.1定制的Casbin的扩展包,使开发者更便捷的在thinkphp项目中使用Casbin。安装创建thinkphp项目(如果没有):1composer create-project topthink/think=5.1.* tp5在ThinkPHP项目里,安装Think-Casbin扩展:1composer require casbin/think-adapter发布资源:1php think casbin:publish这将自动创建model配置文件config/casbin-basic-model.conf,和Casbin的配置文件config/casbin.php。数据迁移:由于Think-Casbin默认将Casbin的策略(Policy)存储在数据库中,所以需要初始化数据库表信息。执行前,请确保数据库连接信息配置正确,如需单独修改Casbin的数据库连接信息或表名,可以修改config/casbin.php里的配置。1php think casbin:migrate这将会自动创建Casbin的策略(Policy)表casbin_rule。中间件ThinkPHP 从 5.1.6+ 版本开始,正式引入中间件的支持。可以通过命令行指令快速生成中间件1php think make:middleware Authorization这个指令会 application/http/middleware 目录下面生成一个 Authorization 中间件。在中间件中,获取当前用户名、URI、请求方法,通过 Casbin 验证权限:1234567891011121314151617181920212223242526272829<?php namespace app\http\middleware; use Casbin;use think\facade\Session; class Authorization{ public function handle($request, \Closure $next) { // 当前登录用户名,这里以session为例 // $user = Session::get('user_name') ?: 'test_user'; $user = Session::get('user_name'); $url = $request->url(); $action = $request->method(); if (!$user){ return response()->data('Unauthenticated.')->code(401); } if (!Casbin::enforce($user, $url, $action)) { return response()->data('Unauthorized.')->code(403); } return $next($request); }}Casbin Model配置config\casbin-basic-model.conf 配置文件:1234567891011[request_definition]r = sub, obj, act [policy_definition]p = sub, obj, act [policy_effect]e = some(where (p.eft == allow)) [matchers]m = r.sub == p.sub && keyMatch2(r.obj, p.obj) && r.act == p.act验证在执行授权之前,先在数据库 casbin_rule 表中添加一些默认的策略:添加路由及其中间件:1234567891011Route::group('users', function () { Route::get('', function () { return 'Users data.'; }); Route::get('/:id', function ($id) { return 'User: '.$id; }); })->middleware(\app\http\middleware\Authorization::class);先登录用户保存用户名到 SESSION ,可以访问 /users、/users/1 验证一下权限。推荐教程:《TP5》以上就是thinkphp中使用Casbin作为权限控制中间件的详细内容

0
0 1402天前
1116
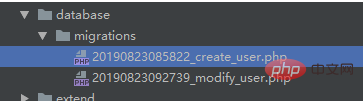
thinkPHP的数据库迁移工具:topthink/think-migration一:安装topthink/think-migration这里注意你安装topthink/think-migration时需要注意你的thinkPHP版本,这里我的thinkPHP版本为5.1,所以可以安装topthink/think-migration的2.0版本,无法安装3.0版本,选择你适合的版本进行安装1composer require topthink/think-migration=2.0.*安装完成之后在命令行执行:1php think如下表示migrate安装成功二:使用topthink/think-migration实现数据库迁移1:创建迁移类在命令行执行1php think migrate:create CreateUser执行完成之后我们就和在./database/migrateions目录下创建一个migrate迁移文件2:实现数据库迁移[1]:migrate代码说明:在migrate中有三个方法up:在migrate:run时执行(前提是文件中不存在change方法)down:在migrate:rollback时执行(前提是文件中不存在change方法)change:migrate:run 和migrate:rollback时执行 (如果存在该方法 则不会去执行up 与down)一般情况下我一般将migrate文件中的change方法删除,up方法专门放置新增和更新表的操作,down方法放置删除表和删除字段操作(1)新增表:12345678// create the table$table = $this->table('user', ['id' => 'user_id', 'comment' => '用户表', 'engine' => 'MyISAM', '']);$table->addColumn('user_name', 'string', ['limit' => 15, 'default' => '', 'comment' => '用户名']) ->addColumn('password', 'string', ['limit' => 15, 'default' => '', 'comment' => '密码',]) ->addColumn('status', 'boolean', ['limit' => 1, 'default' => 0, 'comment' => '状态']) ->addIndex(['user_name'], ['unique' => true])//为user_name创建索引并设置唯一(唯一索引) ->addTimestamps()//默认生成create_time和update_time两个字段 ->create();(2)更新表:123$this->table('user') ->addColumn('test', 'string', ['limit' => 15, 'default' => '', 'comment' => '测试'])//在user表中增加一个test字段 ->update();(3)删除表:1$this->table('user')->drop();(4)删除字段123$this->table('user') ->removeColumn('test')//删除user表中的test字段 ->save();[2]:migrate命令:migrate常用的命令有三个,分别为:123php think migrate:create CreateUser #创建一个迁移类php think migrate:run #执行迁移php think migrate:rollback #迁移回滚推荐教程:《TP5》以上就是thinkPHP使用migrate迁移数据库的详细内容

0
0 1402天前
1149
模型定义一.定义模型1. 定义一个与数据库相匹配的模型12class User extends Model{}2. 模型会自动对应数据表,模型类的命名规则是除去表前缀(例如:tp_)的数据表名称,采用驼峰法命名,并且首字母大写,例如:tp_user(表名) => User(模型名)tp_user_type(表名) => UserType(模型名)3. 如果担心模型的名称和PHP关键字冲突,可以启用类后缀功能,只需要在应用配置文件app.php中设置:12// 开启应用类库后缀'class_suffix' => true,4. 设置完毕后,所有的控制器名与类名都要加上Controller与Model,例如:Class UserModelClass UserController二.模型设置1. 默认主键是id,如果想设置其他主键,类似于uid:1protected $pk = 'uid';2. 在控制器调用模型的时候,如果控制器类名与模型名重复,可以设置别名:use app\test\model\User as UserModel;3. 在模型定义中也可以在模型中设置其他表名:1protected $table = 'tp_other';4. 模型同控制器一样也支持初始化,这里必须设置static静态方法,具体如下:1234protected static function init(){ //初始化内容 }三.模型操作1.模型操作与数据库操作一致,但是模型操作不需要指定表名,例如:数据库操作:1Db::name('user')->all ();模型操作:1User:all();2. 模型操作与数据库操作返回的结果类型不同,数据库操作返回的结果是一个(二维)数组[ [ ] ],而模型操作返回的结果是一个结果集[ { } ]。推荐教程:《TP5》以上就是thinkphp模型定义的详细内容
0
0 1402天前
1188
thinkphp模块改名,如何做。例如,We模块改为You模块步骤如下:We模块:(大小写敏感)1.修改Controller和model的 namespace为You2.替换所有的We\链接为 You\3.替换所有的We/链接为 You/4.替换所有的We@为You@5.替换所有we/ 为 You/6.替换所有we\为You\推荐教程:《TP5》以上就是thinkphp模块改名的方法的详细内容
0
0 1402天前
1071
Thinkphp5.1使用Smarty模板引擎习惯了使用smarty的小伙伴,如果不想修改已有的模板代码,可以直接使用composer安装Smarty库,修改模板配置文件就可以直接使用smarty模板了think-smartyThinkPHP5.1Smarty 引擎驱动安装方法使用composer安装模版引擎方法: composer require emmetltd/think-smartyThinkPHP5.1 配置template.php文件中参数1234567891011121314151617181920212223return [// 模板引擎类型 支持 php think 支持扩展'type' => 'Smarty',// 默认模板渲染规则 1 解析为小写+下划线 2 全部转换小写 3 保持操作方法'auto_rule' => 1,// 模板路径'view_path' => '',// 模板后缀'view_suffix' => 'html',// 模板文件名分隔符'view_depr' => '_', //DIRECTORY_SEPARATOR,// 模板引擎普通标签开始标记'tpl_begin' => '<{',// 模板引擎普通标签结束标记'tpl_end' => '}>',// 标签库标签开始标记'taglib_begin' => '{',// 标签库标签结束标记'taglib_end' => '}','view_replace_str' => [ //字符替换部分'/Upfiles/'=>'http://www.emmetltd.com/Uploads/',],];那么在控制器 index/index::index 中 return view();时会加载模板 index/view/index_index.html推荐教程:《TP5》以上就是thinkphp5.1使用Smarty模板引擎的详细内容
0
0 1402天前
1020
在config.php中添加'allow_module_ip' => ['admin' => '*'], // 设置某些ip可以访问指定模块['admin' => '*'] 所有ip都可以访问admin模块,['admin' => ['127.0.0.1','192.168.1.100']] 仅这两个ip可以访问admin模块最好加在这个位置123456// 禁止访问模块'deny_module_list' => ['common'],// 设置某些ip可以访问指定模块'allow_module_ip' => ['admin' => '*'],// 默认控制器名'default_controller' => 'Index',需要修改框架代码thinkphp/library/think/App.php代码位置如下123456789101112131415161718192021222324252627282930313233343536373839404142434445464748495051public static function module($result, $config, $convert = null) { if (is_string($result)) { $result = explode('/', $result); } $request = Request::instance(); if ($config['app_multi_module']) { // 多模块部署 $module = strip_tags(strtolower($result[0] ?: $config['default_module'])); $bind = Route::getBind('module'); $available = false; if ($bind) { // 绑定模块 list($bindModule) = explode('/', $bind); if (empty($result[0])) { $module = $bindModule; $available = true; } elseif ($module == $bindModule) { $available = true; } } elseif (!in_array($module, $config['deny_module_list']) && is_dir(APP_PATH . $module)) { $available = true; } //region 设置了限制ip访问模块, 如:'allow_module_ip' => ['admin'=>['127.0.0.1']] if (isset($config['allow_module_ip']) && isset($config['allow_module_ip'][$module])) { $allowIps = $config['allow_module_ip'][$module]; if (!in_array($_SERVER['REMOTE_ADDR'], $allowIps) && $allowIps != '*') { $available = false; } } //end region // 模块初始化 if ($module && $available) { // 初始化模块 $request->module($module); $config = self::init($module); // 模块请求缓存检查 $request->cache($config['request_cache'], $config['request_cache_expire'], $config['request_cache_except']); } else { throw new HttpException(404, 'module not exists:' . $module); } } else { // 单一模块部署 $module = ''; $request->module($module); } // ......}推荐教程:《TP5》以上就是thinkphp5配置指定ip访问模块的详细内容
0
0 1402天前
1084
ThinkPHP执行调用存储过程怎么添加日志1234567891011121314151617181920212223242526272829303132333435363738394041424344454647484950515253//PHP代码部分/** * [LogAdd 操作日志] * @param [string] $userid [用户的ID] * @param [string] $type [类型] * @param [string] $controller_name [当前控制器的中文名称] * @param [string] $function_name [当前方法的中文名称] */function LogAdd($userid,$type,$controller_name,$function_name){ //组合数据 $data['userid'] = $userid;//当前操作的用户 $data['type'] = $type;//当前操作的类型 $data['url'] = 'http://'.$_SERVER['HTTP_HOST'].$_SERVER['REQUEST_URI'];//当前操作的URL地址 $data['controller'] = CONTROLLER_NAME;//当前控制器的名称 $data['controller_name'] = $controller_name;//当前控制器的中文名称 $data['function'] = ACTION_NAME;//当前方法的名称 $data['function_name'] = $function_name;//当前方法的中文名称 $data['ip'] = getClientIP();//IP地址 $data['create_time'] = date('Y-m-d H:i:s',time());//登录时间 //表名 $data_fun = 't_sys_logs_'.date('Y',time()); //执行原生SQL $Model = M(); $results = $Model->query('show tables');//打开库 //组装为一维数组进行判断 foreach($results as $k=>$v){ $data_table_show[] = $v['tables_in_dbwxapplite']; } //先判断是否存在表 if(in_array(strtolower($data_fun), $data_table_show)){ //存在表直接添加日志 $loginLog = M($data_fun)->add($data); if($loginLog != false){ $res = ['status' => '1','result' => '写入成功','data' => $loginLog]; }else{ $res = ['status' => '0','result' => '写入失败','data' => $loginLog]; } }else{ //不存在表,先调用存储过程,在执行添加日志 $code = $Model->query("call spCreateTableSysLogs(".date('Y',time()).")"); if($code){ //存储过程成功则添加数据 $loginLog = M($data_fun)->add($data); if($loginLog != false){ $res = ['status' => '1','result' => '写入成功','data' => $loginLog]; }else{ $res = ['status' => '0','result' => '写入失败','data' => $loginLog]; } }else{ //失败 $res = ['status' => '0','result' => '存储过程调用失败','data' => $loginLog]; } } return $res;}12345678910111213//mysql脚本数据库部分-- ------------------------------ Table structure for t_sys_logs_2017-- ----------------------------DROP TABLE IF EXISTS `t_sys_logs_2017`;CREATE TABLE `t_sys_logs_2017` ( `logid` int(11) NOT NULL AUTO_INCREMENT COMMENT '日志ID', `userid` varchar(32) NOT NULL DEFAULT '0' COMMENT '创建人ID', `type` varchar(8) NOT NULL COMMENT '日志操作类型,如:登录;注销;退出;修改密码;创建报名', `url` varchar(100) NOT NULL DEFAULT 'www' COMMENT '当前操作的URL', `controller` varchar(30) NOT NULL DEFAULT '控制器的名称' COMMENT '当前控制器的名称', `controller_name` varchar(30) NOT NULL DEFAULT '控制器的中文名称' COMMENT '当前控制器的中文名称', `function` varchar(30) NOT NULL DEFAULT '方法的名称' COMMENT '当前方法的名称', `function_name` varchar(30) NOT NULL DEFAULT '方法的中文名称' COMMENT '当前方法的中文名称', `ip` varchar(30) NOT NULL DEFAULT '255.255.255.255' COMMENT '当前操作客户端IP', `create_time` timestamp NOT NULL DEFAULT '0000-00-00 00:00:00' COMMENT '创建时间', `update_time` timestamp NOT NULL DEFAULT '0000-00-00 00:00:00' ON UPDATE CURRENT_TIMESTAMP COMMENT '更新时间', PRIMARY KEY (`logid`)) ENGINE=InnoDB AUTO_INCREMENT=2 DEFAULT CHARSET=utf8mb4 COMMENT='操作日志表';以上就是ThinkPHP执行调用存储过程怎么添加日志的详细内容
0
0 1402天前
1043
本地使用,一切正常;后端项目和前端项目都部署到服务器,一切正常;后端项目部署到服务器,并设置允许跨域访问后,本地前端项目使用服务器上后端项目接口时,问题来了:首先,使用postman测试获取图片验证码接口和验证图片验证码接口,正常。然后,在html中使用获取图片验证码接口,正常;最后,在JS中使用验证图片验证码接口,出错!!!分析通过问题描述,我们看出,问题出现在跨域上。那么,有两种可能,一种是因为跨域设置不正确;一种是因为thinkphp本身的问题。采用另外一种跨域配置,问题依然存在。那就是thinkphp本身的问题了,经查找资料,问题定位在thinkphp的session跨域上。跨子域解决办法其实不管是ThinkPHP还是php本身,在解决session跨域问题的时候都需要设置session.cookie_domain。针对session跨域这一问题的解决方法主要有以下几种:第一种情况:如果目录下没有.htaccess这个文件,也就是没有采取url伪静态的话,那么,在conf/config.php的第一行加上:1ini_set('session.cookie_domain',".domain.com");//跨域访问Session这时如果你开启了调试,那么可以用!但关闭了调试,就不管用了!第二种情况:如果你目录下有.htaccess这个文件,那么你在根目录,index.php的第一行加入:123<?php ini_set('session.cookie_domain',".domain.com");//跨域访问Session// 应用入口文件?>这种方法不管开不开启调试都管用!然而,我们的问题并不是跨子域的问题,而是完全跨域,所以上述方法无效。完全跨域解决办法获取图片验证码请求查看获取图片验证码的请求信息,Request Headers为:12345678Accept:image/webp,image/*,*/*;q=0.8Accept-Encoding:gzip, deflate, sdchAccept-Language:zh-CN,zh;q=0.8,en-US;q=0.6,en;q=0.4Connection:keep-aliveCookie:pma_lang=zh_CN; pma_collation_connection=utf8_unicode_ci; pma_iv-1=wnpO4gv0eQRW1AMHmGr2ww%3D%3D; pmaUser-1=weZPqS0%2BW7nzFUVHRdqcfA%3D%3DHost:api.voidking.comReferer:http://localhost/ajax/ajax.htmlUser-Agent:Mozilla/5.0 (Windows NT 6.3; Win64; x64) AppleWebKit/537.36 (KHTML, like Gecko) Chrome/54.0.2840.71 Safari/537.36Response Headers为:1234567891011Access-Control-Allow-Origin:*Cache-Control:post-check=0, pre-check=0Cache-Control:private, max-age=0, no-store, no-cache, must-revalidateConnection:keep-aliveContent-Type:image/pngDate:Sun, 27 Nov 2016 12:10:44 GMTExpires:Thu, 19 Nov 1981 08:52:00 GMTPragma:no-cacheServer:nginxSet-Cookie:PHPSESSID=721t4sqanvsii550m1dk8gq1o3; path=/; domain=.voidking.comTransfer-Encoding:chunked验证验证码请求查看验证验证码的请求信息,Request Headers为:12345678910Accept:application/json, text/javascript, */*; q=0.01Accept-Encoding:gzip, deflateAccept-Language:zh-CN,zh;q=0.8,en-US;q=0.6,en;q=0.4Connection:keep-aliveContent-Length:9Content-Type:application/x-www-form-urlencoded; charset=UTF-8Host:api.voidking.comOrigin:http://localhostReferer:http://localhost/ajax/ajax.htmlUser-Agent:Mozilla/5.0 (Windows NT 6.3; Win64; x64) AppleWebKit/537.36 (KHTML, like Gecko) Chrome/54.0.2840.71 Safari/537.36Response Headers为:123456789101112Access-Control-Allow-Origin:*Cache-Control:no-store, no-cache, must-revalidate, post-check=0, pre-check=0Connection:keep-aliveContent-Encoding:gzipContent-Type:text/html; charset=UTF-8Date:Sun, 27 Nov 2016 12:13:21 GMTExpires:Thu, 19 Nov 1981 08:52:00 GMTPragma:no-cacheServer:nginxSet-Cookie:PHPSESSID=149t0hhs2icqaaemvp39onkgp4; path=/; domain=.voidking.comTransfer-Encoding:chunkedVary:Accept-Encoding再次获取图片验证码请求Request Headers为:123456789Accept:image/webp,image/*,*/*;q=0.8Accept-Encoding:gzip, deflate, sdchAccept-Language:zh-CN,zh;q=0.8,en-US;q=0.6,en;q=0.4Cache-Control:max-age=0Connection:keep-aliveCookie:pma_lang=zh_CN; pma_collation_connection=utf8_unicode_ci; pma_iv-1=wnpO4gv0eQRW1AMHmGr2ww%3D%3D; pmaUser-1=weZPqS0%2BW7nzFUVHRdqcfA%3D%3D; PHPSESSID=721t4sqanvsii550m1dk8gq1o3Host:api.voidking.comReferer:http://localhost/ajax/ajax.htmlUser-Agent:Mozilla/5.0 (Windows NT 6.3; Win64; x64) AppleWebKit/537.36 (KHTML, like Gecko) Chrome/54.0.2840.71 Safari/537.36Response Headers为:12345678910Access-Control-Allow-Origin:*Cache-Control:private, max-age=0, no-store, no-cache, must-revalidateCache-Control:post-check=0, pre-check=0Connection:keep-aliveContent-Type:image/pngDate:Sun, 27 Nov 2016 13:26:21 GMTExpires:Thu, 19 Nov 1981 08:52:00 GMTPragma:no-cacheServer:nginxTransfer-Encoding:chunked三次请求比较第一次获取图片验证码请求,Cookie中没有PHPSESSID,所以,返回信息中有Set-Cookie。第二次获取图片验证码请求,Cookie中含有PHPSESSID,所以,返回信息中没有了Set-Cookie。而且第一次请求返回信息Set-Cookie中的PHPSESSID,和第二次请求请求信息Cookie中的PHPSESSID是相同的。而验证图片验证码的ajax请求,没有Cookie,自然也没有PHPSESSID,所以,返回信息中也有Set-Cookie。可见,我们需要在前端做一些修改,使之发送请求时带着Cookie。前端jquery设置1234567891011121314151617181920212223242526272829303132333435363738<!DOCTYPE html><html><head> <meta charset="UTF-8"> <title>jquery</title></head><body> <p> <img src="http://api.voidking.com/owner-bd/index.php/Home/CheckCode/getPicCode" alt=""> <input type="text" id="picCode"> <input type="button" id="send" value="验证"> </p><script src="http://apps.bdimg.com/libs/jquery/2.1.4/jquery.min.js"></script><script> $(function(){ $('#send').click(function(){ //console.log(document.cookie); $.ajax({ url: 'http://api.voidking.com/owner-bd/index.php/Home/CheckCode/checkPicCode', type: 'POST', crossDomain: true, xhrFields: { withCredentials: true }, dataType: 'json', data: {code: $('#picCode').val()}, success: function(data){ console.log(data); }, error: function(xhr){ console.log(xhr); } }); }); });</script></body></html>请求时报错如下:1A wildcard '*' cannot be used in the 'Access-Control-Allow-Origin' header when the credentials flag is true. Origin 'http://localhost' is therefore not allowed access. The credentials mode of an XMLHttpRequest is controlled by the withCredentials attribute.出现了跨域报错,可见后端也需要做一些修改,使之可以接收跨域Cookie。后端nginx设置12add_header Access-Control-Allow-Origin http://localhost;add_header Access-Control-Allow-Credentials true;注意:服务器端Access-Control-Allow-Credentials参数为true时,Access-Control-Allow-Origin参数的值不能为*。后端nginx设置后,jquery的ajax请求正常了,可以携带Cookie,后端正常接收数据并返回数据。由于angular的ajax请求不同于jquery,所以,我们还需要研究一下angular怎么发送携带Cookie的跨域请求。前端angular设置1234567891011121314151617181920212223242526272829303132333435363738<!DOCTYPE html><html><head> <meta charset="utf-8"> <title>angular</title> <script src="http://cdn.static.runoob.com/libs/angular.js/1.4.6/angular.min.js"></script></head><body ng-app="myApp" > <p ng-controller="myCtrl"> <img src="http://api.voidking.com/owner-bd/index.php/Home/CheckCode/getPicCode" alt=""> <input type="text" id="picCode" ng-model="picCode"> <input type="button" ng-click="send()" value="验证"> </p><script> var app = angular.module('myApp', []); app.controller('myCtrl', function($scope, $http, $httpParamSerializer) { $scope.send = function(){ $http({ method:'POST', url:'http://api.voidking.com/owner-bd/index.php/Home/CheckCode/checkPicCode', headers:{ 'Content-Type':'application/x-www-form-urlencoded' }, withCredentials: true, dataType: 'json', data: $httpParamSerializer({code: $scope.picCode}) }).then(function successCallback(response) { console.log(response.data); $scope.username = response.data.username; }, function errorCallback(response) { console.log(response.data); }); } });</script> </body></html>推荐教程:《TP5》以上就是thinkphp中session跨域问题解决的详细内容

0
0 1402天前
1015
thinkphp 日志记录日志的处理工作是由系统自动进行的,在开启日志记录的情况下,会记录下允许的日志级别的所有日志信息。其中,为了性能考虑,SQL日志级别必须在调试模式开启下有效,否则就不会记录。 系统的日志记录由核心的Think\Log类及其驱动完成,提供了多种方式记录了不同的级别的日志信息。默认情况下只是在调试模式记录日志,要在部署模式开启日志记录,必须在配置中开启LOG_RECORD参数,以及可以在应用配置文件中配置需要记录的日志级别,例如:'LOG_RECORD' => true, // 开启日志记录'LOG_LEVEL' =>'EMERG,ALERT,CRIT,ERR', // 只记录EMERG ALERT CRIT ERR 错误日志级别ThinkPHP对系统的日志按照级别来分类,包括:EMERG 严重错误,导致系统崩溃无法使用ALERT 警戒性错误, 必须被立即修改的错误CRIT 临界值错误, 超过临界值的错误ERR 一般性错误WARN 警告性错误, 需要发出警告的错误NOTICE 通知,程序可以运行但是还不够完美的错误INFO 信息,程序输出信息DEBUG 调试,用于调试信息SQL SQL语句,该级别只在调试模式开启时有效记录方式日志的记录方式默认是文件方式,可以通过驱动的方式来扩展支持更多的记录方式。记录方式由LOG_TYPE参数配置,例如:'LOG_TYPE' => 'File', // 日志记录类型 默认为文件方式File方式记录,对应的驱动文件位于系统的Library/Think/Log/Driver/File.class.php。手动记录一般情况下,系统的日志记录是自动的,无需手动记录,但是某些时候也需要手动记录日志信息,Log类提供了3个方法用于记录日志。方法描述Log::record()记录日志信息到内存Log::save()把保存在内存中的日志信息(用指定的记录方式)写入Log::write()实时写入一条日志信息由于系统在请求结束后会自动调用Log::save方法,所以通常,你只需要调用Log::record记录日志信息即可。record方法用法如下:\Think\Log::record('测试日志信息');默认的话记录的日志级别是ERR,也可以指定日志级别:\Think\Log::record('测试日志信息,这是警告级别','WARN');record方法只会记录当前配置允许记录的日志级别的信息,如果应用配置为:'LOG_LEVEL' =>'EMERG,ALERT,CRIT,ERR', // 只记录EMERG ALERT CRIT ERR 错误那么上面的record方法记录的日志信息会被直接过滤,或者你可以强制记录:\Think\Log::record('测试日志信息,这是警告级别','WARN',true);采用record方法记录的日志信息不是实时保存的,如果需要实时记录的话,可以采用write方法,例如:\Think\Log::write('测试日志信息,这是警告级别,并且实时写入','WARN');write方法写入日志的时候 不受配置的允许日志级别影响,可以实时写入任意级别的日志信息。推荐教程:《TP5》以上就是thinkphp日志记录配置教程的详细内容
0
0 1402天前
1103
thinkphp5的Redis缓存配置thinkphp采用cache类提供缓存功能支持,采用驱动方式,在使用缓存之前需要进行初始化操作。支持的缓存类型包括file、memcache、wincache、sqlite、redis和xcache等,默认情况下是file类型,配置redis缓存可以单一配置redis也可以同时使用多个缓存类型。配置方式分别如下:thinkphp采用cache类提供缓存功能支持,采用驱动方式,在使用缓存之前需要进行初始化操作。支持的缓存类型包括file、memcache、wincache、sqlite、redis和xcache等,默认情况下是file类型,配置redis缓存可以单一配置redis也可以同时使用多个缓存类型。配置方式分别如下:一、仅配置redis缓存,在配置文件(app/config.php)中修改缓存设置如下:二、配置多个缓存类型,使用符合缓存类型,配置方式如下:12345678910111213141516171819202122232425'cache' => [ // 使用复合缓存类型 'type' => 'complex', // 默认使用的缓存 'default' => [ // 驱动方式 'type' => 'File', // 缓存保存目录 'path' => CACHE_PATH, ], // 文件缓存 'file' => [ // 驱动方式 'type' => 'file', // 设置不同的缓存保存目录 'path' => RUNTIME_PATH . 'file/', ], // redis缓存 'redis' => [ // 驱动方式 'type' => 'redis', // 服务器地址 'host' => '192.168.1.100', ], ],使用符合缓存类型时,需要根据需要使用store方法切换缓存。当使用Cache::set('name', 'value');Cache::get('name');的时候,使用的是default缓存标识的缓存配置。如果需要切换到其它的缓存标识操作,可以使用:// 切换到file操作Cache::store('file')->set('name','value');Cache::get('name');// 切换到redis操作Cache::store('redis')->set('name','value');Cache::get('name');比如,查询一篇文章时首先从redis中查询,若未查到信息则从数据库中查询出结果,并存储到redis中。推荐教程:《TP5》以上就是thinkphp5的Redis缓存配置的详细内容

0
0 1402天前
1231
出现乱码的问题是因为thinkphp分页类中的,构造url时存在的问题,thinkphp的分页url是使用"/"来分隔参数的,在将数据传递到url中时,经过url加密,第二次传递的时候就会乱码了,而如果我们使用"?"和"&"来分隔参数的话,就不会出现这个问题了。所以要修改的内容是thinkphp的分页类文件:/ThinkPHP/Extend/Library/ORG/Util/Page.class.php文件。具体修改的代码是:1、在thinkphp分页类文件Page.class.php的最后加上一个自定义函数,用于替换url中的参数分隔符号,函数内容如下:1234567private function clin_page_url($parameter){ $url = U(''); $url = str_replace('.html', '?', $url); foreach ($parameter as $key => $value) { $url .= $key.'='.$value.'&'; } $url = substr($url, 0,-1); return $url;}自学php博客2、修改最终生成的url在Page.class.php文件的第99行,将原来的1$url=U('',$parameter);修改为:1$url=$this->clin_page_url($parameter); // 生成标准的url经过这两步修改就可以解决thinkphp分页乱码的问题了。相关参考:thinkphp教程以上就是如何解决thinkphp分页出现乱码问题的详细内容
0
0 1402天前
1154
下面由thinkphp框架开发栏目给大家介绍Thinkphp volist多重循环原样输出数组key值的使用总结,希望对需要的朋友有所帮助!最近因为项目的缘故,要使用到volist。在这个过程中,遇到了一些小问题,主要就是volist在循环输出多重数据的时候,如何输出key。网上查阅了不少资料,很失望的是,大多资料就是粘贴复制Thinkphp手册上volist标签的说明。为了帮助其他人,故决定写下这篇文章。( 在这里,使用的框架是Thinkphp3.2,其它的相关知识,是php数组)。首先贴出控制器里面代码:123456public function check(){ $multiArr = [['a' => ['num' => '1',], 'b' => ['num' => '2',]], ['c' => ['num' => '3',], 'd' => ['num' => '4',]]]; $this->assign('list', $multiArr); $this->display();}打印出来的格式如下:12345678910111213141516171819202122232425Array( [0] => Array ( [a] => Array ( [num] => 1 ) [b] => Array ( [num] => 2 ) ) [1] => Array ( [c] => Array ( [num] => 3 ) [d] => Array ( [num] => 4 ) ))很明显,这是一个多重数组。如果想得到他们的key值,如果使用volist,代码如下:12345678910111213<tr><volist name="list" id="data" key="k"><td>{$k}</td><td><tr><volist name="data" id="vo"><td>{$key}</td><td>{$vo.num}</td></volist></tr></td></volist></tr>得到的结果如下:12341a 1 b 22c 3 d 4在这里,很明显,外重的循环的key值是系统默认的,而里面的这一重循环出来的key值是由数据本身决定的而不是由循环控制的。1http://document.thinkphp.cn/manual_3_2.html#volist在Thinkphp手册里面,这个说的很清楚。如果到这里,没其他的要求的话,其实可以满足大多数输出key值的要求了。但是如果数组改成下面的格式:123456789101112131415161718$multiArr = [ 'aaa' => [ 'a' => [ 'num' => '1', ], 'b' => [ 'num' => '2', ] ], 'bbb' => [ 'c' => [ 'num' => '3', ], 'd' => [ 'num' => '4', ] ] ];并且此时,外重循环出的key值和内层循环出的key值均由数据本身决定,而不是循环控制的,那该怎么处理呢?好吧,当时走入误区了,一直想用两个volist进行循环,然后输出key值(它由数据本身决定),但是尝试了好久,发现还是不行。查阅了不少的资料,发现好多都没有讲到这个问题。谋杀了无数脑细胞,看着代码,突然想到,foreach也可以进行这种循环操作,为啥不尝试用这个标签呢?或者把这两个标签结合起来使用呢?顿时,豁然开朗。于是,把前端的代码改成如下:12345678910111213<tr> <foreach name="list" item="data" key="i"> <td>{$i}</td> <td> <tr> <volist name="data" id="vo" key="k"> <td>{$key}</td> <td>{$vo.num}</td> </volist> </tr> </td> </foreach> </tr>得到的结果如下:1234aaaa 1 b 2bbbc 3 d 4满足了上面的要求。总结如下:在thinkphp中,用volist标签进行多重数组循环输出的时候,若想输出由数据控制的key值,而不是默认的,可以把foreach标签和volist标签结合起来使用,就能原样输出key值了。以上就是Thinkphp volist多重循环原样输出数组key值的详细内容
0
0 1402天前
1081
【一】概论(1)介绍Highcharts基于jquery开发的国外图标插件,统计图,折线图,饼状图等常常用到。国内也有一款类似插件echarts,由百度开发。(2)支持特效demo:3D、仪表盘、折现、类心电图实时刷新、柱状、点状、雷达、漏斗、金字塔漏斗图:常用于销售走势,最上方为有意向用户,底部为成交客户。具体有以下几类(3)应用实例:QQ的全国在线人数分布,通过Flash做的;百度echarts的全国数据分布,通过js做的非常直观反映出中国互联网发展情况和地域。亮点越多说明当地互联网越发达。发达地区有北上广,重庆(4)echarts包含更加丰富的demo,拓展了许多,包含全球航线、股票数据走势(5)用法基本一致【二】案例使用Highcharts实现部门人数统计要求:使用图标形式统计出每个部门人数(1)准备和步骤:1. 选样式目录,这里我用的examples/column-rotated-labels;2. 分析demo:①引入jquery和js类文件;②替换data数据;③声明div图标容器,用来放置图标(2)开始编写1. 修改模板文件User/showList.html,将下面的统计按钮设置链接,点击后跳到统计页面这里不用做任何操作,所以直接修改a标签的href即可,写成什么呢?这要看方法了2. 定义图标页面方法charts,方法写在了User控制器里,所以href写为__CONTROLLER__/charts3. 定义charts方法展示图表模板文件1234//charts图表 public function charts(){ $this->display(); }4. 复制模板文件到指定位置;同时为了更快在线上访问网站,需要复制静态资源文件到站点目录下;①这里是复制到User/charts,html下;②引入静态资源并修改路径:这里为了方便,我直接把整个code复制到了静态资源目录下,后期使用的插件都放到plugin(插件)目录下5. 改写chars方法,查询出数据,替换模板文件中的数据先分析下最终数据格式:,产品部:10,技术部20,外交部30......仅仅一个数据表无法实现,所以需要联表查询(sp_user、sp_dept)主表sp_user(t1);从表sp_dept(t2);关联条件:t1.dept_id = t2.id原生SQL语句table方法:1select t2.name as deptname,count(*) as count from sp_user as t1,sp_dept as t2 where t1.dept_id=t2.id group by deptname;在Navicat中运行后输出正确,所以接下来TP连贯操作:1234567public function charts(){$model = M(); //连贯操作$data = $model->field('t2.name as deptname,count(*) as count')->table('sp_user as t1,sp_dept as t2') ->where('t1.dept_id=t2.id')->group('deptname')->select();dump($data);die;$this->display(); }输出$data结果:1234567891011121314array(3) { [0] => array(2) { ["deptname"] => string(9) "人力部" ["count"] => string(1) "3" } [1] => array(2) { ["deptname"] => string(9) "技术部" ["count"] => string(1) "2" } [2] => array(2) { ["deptname"] => string(9) "财务部" ["count"] => string(1) "3" }}如果当前使用的ThinkPHP版本为5.6+,则可以直接将data二维数组assign,不需要任何处理。5.6以下版本需要进行字符串拼接1234567$str = "[";//循环遍历字符串 foreach ($data as $key => $value) { $str .= "['".$value['deptname']."',".$value['count']."],"; } //去除最后的, $str = rtrim($str,','); $str .= "]";6. 变量传递给模板;7. 修改模板,接收变量。删除原先的数组,改为传递变量即可data:{$str},(3)细节完善1. 修改表头2. 修改左侧单位信息3. 修改鼠标悬浮效果(截止当前)4. 修改图标上小数点(1f改为0f,表示精确到0位);5. 至于打印图片的操作,需要修改highcharts.js,从源码上修改即可。查询输入相关单词,修改即可总结:(1).1f表示精确到1位小数(如3.0、5.0),若不想要.0,则可以精确到0位小数即可(如3、5)以上就是ThinkPHP---插件highcharts的全部内容。相关参考:thinkphp教程以上就是插件highcharts在thinkphp中的使用的详细内容
0
0 1402天前

